


I have a corkboard next to my screen printing table to hold all those random little scraps of paper that I'm always collecting. I love pinning up new, pretty things, but those plastic pushpins weren't doing anything for me. I whipped up this project with materials I already had on-hand and love how they unify my board! Here's what you'll need to make your own:

- Pushpins. Use up those mis-matched ones you already have. Where did that single yellow one come from, anyway?
- White Fimo or Sculpey. I used FIMO Soft
- Assorted acrylic paints. I used Martha Stewart Paints in Pea Shoot, Scallion, Beach Glass, and Beetle Black
- Paint brush
- Scrap of cardboard
Start by making spaced-out holes in the cardboard with a pushpin. Make one hole for each pin. Pull off a small piece of Fimo from the block. Soften it in your hands and roll out a little ball and a long flattened piece (technical terms, people).

Roll the flattened piece around the pushpin, removing any excess that overlaps too much. Roll it between your fingers to smooth it out around the pin. Flatten the ball a little, and add it to the top. Work it between your fingers until it's smooth and the seams disappear.
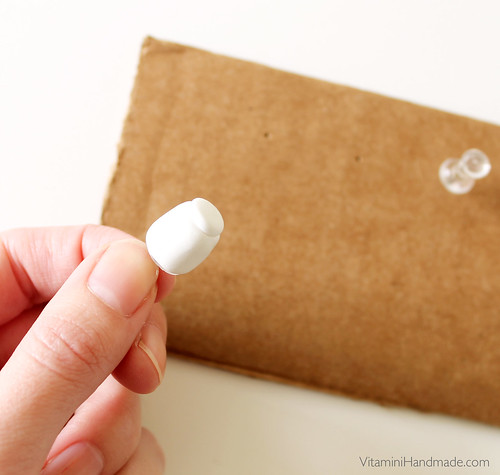
Carefully put it into your cardboard rack in one of the holes you made earlier. Repeat until your rack is full (or your cup runneth over, whichever comes first).

Bake on the cardboard rack according to the instructions on the clay label. (Cardboard will not catch fire at the low temperature the clay requires, but do not leave it unattended. The Sculpey site has more information about safe baking techniques.)
When your pieces are cool, paint them with the light color. Just leave them on the rack and paint around them.
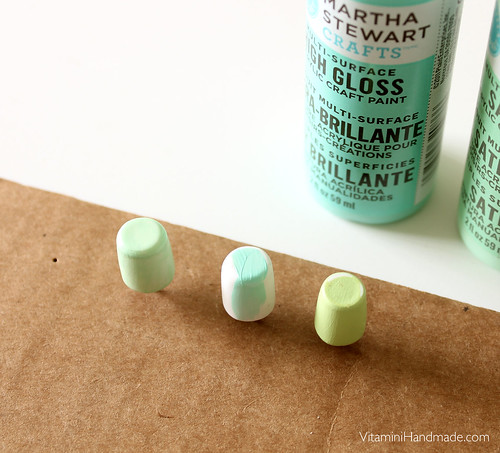
Add the black accents. Paint just the middle, or just the top, or try an angled, dipped look. Make a bunch!


Let them dry, and done! A set of these would be a nice gift for a coworker. Make them in her favorite colors!

I think these bad boys will really class-up my cork board. I'm off to go make some more! Have a wonderful weekend!
This is a great idea, I too have those plain plastic push pins and was thinking of how to make them more chic and this is a great solution. Thanks Casey I will be trying this soon.
ReplyDeleteCool! Let me know how they turn out!
Deletewhat a brilliant idea! you could even try and make different shapes.
ReplyDeleteLauren | OhHay Blogs!
xxx
Yes! I made a few cubed ones before I settled on the round peg shape. Add glitter if you want to get a little crazy with it. ;)
DeleteWoah, these are so cool! I had no idea you could bake clay on cardboard like that,. It opens up so many possibilities :)
ReplyDeleteBandar Togel
ReplyDeleteBandar Togel Terpercaya
Agen judi Togel
Agen Togel Terpercaya
Situs togel terpercaya
Togel Sydney
Togel Singapore
Togel Hongkong
Prediksi Togel
Buku Mimpi
Angka Jitu Togel
Situs Judi Online terbaik dan terlengkap dengan permainan Sportbook, Live Casino, Slot Machine. IDN POKER dan IDN LIVE
ReplyDeleteSitus Judi Online
Daftar Situs Judi Online
Poker Online
Agen Bola Terpercaya
Judi Online Terpercaya
Situs Judi Online Terbaik
Situs Poker online terbaik yang memiliki permainan Texas Hold'em Ceme, Ceme Keliling, Capsa, Super 10, Omaha
Poker Online Indonesia
Poker Online
Domino
Ceme Keliling
Capsa
Super 10
Omaha
Daftar Poker Online
Agen Poker Terpercaya
Situs Togel Online terpercaya yang lengkap dengan prediksi yang dapat membantu anda dalam menuju Jackpot
4D/3D/2D
Colok Bebas
Colok Naga
Colok Jitu
Tengah Tepi
Kombinasi
Dasar
50-50
Shio
Silang Homo
Kembang Kempis
24D
Roulette
Sicbo
12D Games
Head&Tail
Oglok
Dice 6
Red/White
Billiards
Poker Dice
Gong Ball
Suwit
Monopoly
ICNPRODUK
EpicBigWin
RainbowTraveling