6

Cherry blossom wreath how-to.

Tuesday, March 27, 2012

Cherry Blossom Wreath 
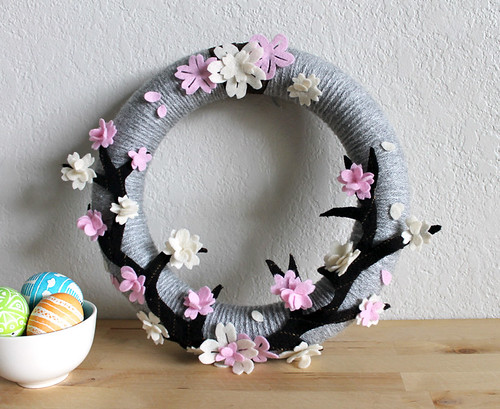
I am totally addicted to making wrapped yarn wreaths! They are simple to make (depending on the level of detail) and can be customized for any season or holiday. The supplies are also inexpensive and easy to keep on hand. I started this one when I was in the middle of packing up my apartment for a move and was desperate to do something creative to maintain a little bit of my sanity. The first day of Spring was just last week, so I wanted to do something to mark the season: cherry blossoms!

Here's what you will need:
Wreath form, 12" diameter  - I used a foam one
Skein of yarn - I used light gray
Felt - Cream, pink, and brown
Embroidery floss - any light color
Wire (optional)
Tacky glue
Hot glue
Ribbon for hanging


Wrap the wreath with the yarn, covering the entire form. I like to do this while I watch tv or a movie. Tie off the ends.


Cut flowers out of felt. I like to cut the felt into squares of varying sizes (about 1.5" to .5") before I cut the actual flowers. This helps to keep them somewhat uniform in size, even though they all come out a little different. Cut little v-shaped notches into the ends of the petals of some of the flowers. Cut little strips out of the center of the larger flower petals.


To make the ruffled centers of the blossoms, gather the petals of a single flower in your fingers and fold it, making the center of the flower a point. Using a needle and your embroidery floss, stitch through the center point a couple of times. Tie the floss in knot and trim.


I made about 36 flowers total. Once all of your flowers are cut and some are stitched, layer a few of the ruffled centers and the flat flowers, gluing them in the center with hot glue.


To make the branches, lay out your brown felt and cut two different branch shapes. You will be covering the branches with flowers, so keep the branch forms simple. Instead of regular felt, I used this felted, pinstripe wool that I had on hand from another project.


To add dimension to the branches, glue wire to the back of the main center branch and a few off-shoots. I couldn't find any regular wire in my craft supplies, so I used picture-hanging wire and it worked just fine! Tacky glue worked really well for attaching it to the felt. Once the glue is dry, bend your wire to give your branches shape.


Now all the components are ready to start laying everything out! Experiment with a few different layouts to find what you like the best. I used larger blossoms at the top of the wreath and at the bottom where the branches come together, to ground the design. I also added tiny felt "petals" and attached them in a random pattern to give the design movement. Wrap the top of the wreath with ribbon for hanging.


Here it is all finished! It was a fun little project and a nice distraction from all of the packing I've been doing lately. I can't wait to hang it on my new front door! Do you love felt and yarn wreaths as much as I do?

(Those Easter eggs in the picture were a project from last year. If you'd like to see how I made them, check out this post.)

4

Pleasant surprise.

Tuesday, March 20, 2012

I love thrift shopping, especially for housewares and furniture. In fact, most of my apartment is furnished with second-hand items that I've accumulated over the years. It's a direct result of wanting good-quality furniture, but not having much money to spend. I'm also one of 4 girls, so there aren't many hand-me-downs to go around in the family. About two years ago, I was excited to find this cute little ottoman in my local Goodwill for something like $8. I saw a lot of potential in it! Even though it was filthy.


Thankfully, it was upholstered with thick orange vinyl, so it was easy to scrub. And boy, did I scrub! I also cleaned up the wood a bit with Murphy's soap. I always planned on recovering it with a new fabric, but after a while the orange started to grow on me and I ended up keeping it around the way it was. Look how nice the orange looks with my rug.


 I still disliked the vinyl, though and the bunchy edges always bothered me. It was clearly a diy job from long ago. Fast forward to last Saturday, I was looking for a distraction from my moving boxes and decided to take off that nasty vinyl and see what was underneath!


Looks promising.


Had to pull out tons of these tiny, old nails. The little ones were less than 1/4" long.


This is when I started getting nervous that I'd find a big gash in the front of the fabric, or worse!


The upholstery fabric was in perfect condition! It was a little dusty, though, so I vacuumed it really well, and here it is! It's a nice multi-color tweed and still has that orange that I loved. Who ever would have covered up this cool fabric? Who knows, but I'm pleased. It feels like I have a brand new piece of furniture.

8

Movin' on up.

Wednesday, March 14, 2012

Apparently, it's that time of year again. The time where I must pack up all of my earthly belongings and move them and myself to new and uncharted territory. I'm getting ready to move again!

Photo from hastingsgraham on Flickr.
So, in an effort to retain the tiny bit of sanity that I have left, I'll be shutting down my Etsy shop for a few weeks and will open it up when I'm settled and the cardboard fog has lifted. I'll be spending the next few weeks packing and attempting to downsize. Anyone want a plastic Christmas tree stand? I'm getting rid of it and have fully committed to finding an aluminum tree next year. Why the heck am I thinking about Christmas? Ah the joys of moving... Can't I just live in one of these teardrop trailers?


Oh wait, there's no room for my screen printing supplies... Oh well. So if you've been meaning to place an order in my Etsy shop, do it soon! I'll be closing the shop down on Saturday. I promise to have it back up and running as soon as I can, though! If you'd like to see more of this super cool teardrop, check out this Sunset article about Glam camping.

2

Happy weekend!

Saturday, March 10, 2012

Yay, it's Saturday! I've got a few projects I'm finishing up this weekend so I have lots to do. In the meantime my "to do" list for new projects is getting longer by the day. Check out these super cool geometric gift boxes from Ruffled via Paper Crave.


Click the Ruffled link for the tutorial. There are three different shapes, and you can make them in any color. I'm thinking silver and gold would be really cool...

Have a great weekend, and don't forget to "spring forward" on Sunday. I'm still grumbling about losing a precious hour, but it'll be nice to have more sunshine in the evenings when I get off work.

26

Office supplies.

Tuesday, March 6, 2012

I'm still recovering from that terrible cold I got last week. It's been 7 days and I my voice is still far from normal. I dragged myself off the couch on Saturday and took a trip to the art store for some supplies. Maybe it's because I was feeling sorry for myself because I had been sick for so long, but I just couldn't resist the super cute office supplies. I treated myself to these:


How cool is that little eraser?! It's got a built-in pencil sharpener, too! They had them in so many colors but I was particularly dazzled by the hot pink. I also got a gray Le Pen. I got hooked on those when I was in drawing class in college. That green Zebra pocket pen looks tiny, but it expands to a full-size! I love this stuff. :)
 

vitamini handmade © All rights reserved · Theme by Blog Milk · Blogger