189

DIY Ombre Sequin Ornaments

Wednesday, December 9, 2015

DIY Ombre Sequin Oraments Beaded, sequin-covered ornaments were a popular craft in the 60's and I have distinct memories of admiring them on my grandma's Christmas tree every year as a kid. If it was sparkly, I was all over it and those ornaments were the shiniest things around! I've been meaning to try making my own modern interpretation for years so I finally made the time and came up with these ombre sequined ornaments. I'm so excited with how they turned out! While the materials are really inexpensive and the technique is simple, it takes a while to do. It's not a quick craft by any means! I made mine over a couple evenings, sitting down in front of Netflix (Broadchurch, watch it!) whenever I had the time. This is the sort of craft that will become an heirloom so take your time and don't rush it. It's actually a pretty relaxing activity once you get going and the results are absolutely stunning. No one will believe you made it yourself!

Here's what you'll need:
DIY Ombre Sequin Oraments
  • Sequin pins. These are shorter than regular pins and they come in silver or gold
  • Sequins. You'll need at least three different shades to get an ombre affect
  • Seed beads in the color of your choice. I chose clear with silver lining
  • Tacky glue
  • 2 1/2" Styrofoam balls
  • Ribbon
  • Short length of wire. Any gauge will work
  • A tray or shoebox lid to work on
  • Small containers

DIY Ombre Sequin Oraments

Separate the sequin colors into containers. Pour some of the beads into a shallow container. Cut a length of ribbon about 8" and tie the ends. Make a U shape with the wire, hook the end around the ribbon loop, and add some tacky glue to the ends. Push the wire into the top of a styrofoam ball until ribbon is flush with the top of the ball. Let dry. Draw a line around the center of the ball with a permanent marker, to help guide the ombre design.

DIY Ombre Sequin Oraments DIY Ombre Sequin Oraments

Thread a bead onto a pin, followed by a sequin in your lightest color. Make sure it's right side up - u shape instead of n shape for maximum sparkle! Dip the end of the pin in some tacky glue, and push the pin into the top of the ball right next to the ribbon. Continue adding beads and sequins all the way around the ribbon, slightly overlapping each so the styrofoam doesn't show through.

DIY Ombre Sequin Oraments

Keep going!! When you get about a third of the way down, start transitioning to the middle color sequins, and then to the last color about 2/3 of the way down. I mixed in a few sequins of the next color here and there to make the color transition more gradual.

DIY Ombre Sequin Oraments

tips
  • Instead of trying to thread each tiny bead onto the pin, just slide the pin through the container of beads. You'll pick one or a few up every time.
  • Squirt out some glue onto a scrap of cardboard and dip the pin ends into into that. Make sure to use glue - you don't want the pins falling out when you're finished! 
  • Set up all of your little containers and glue inside a tray or shoebox lid. This will help keep sequins, beads, and pins from going all over the place if it gets bumped, and makes it easier to put aside when you want to take a break.
DIY Ombre Sequin Oraments DIY Ombre Sequin Oraments

These ornaments are so pretty - even better in person! I love the ombre look, but you can try other designs and patterns, too. Stripes, swirls, polka dots. When I bought my supplies I also got a styrofoam cone that would make the prettiest Christmas tree. We'll see if I have enough time to tackle that! I'm not even done with the aqua/teal/blue one yet! :) I hope you'll try making some yourself!

DIY Ombre Sequin Oraments
P.S. Check out lots of projects from holidays past in the DIY Gallery!

*this post contains affiliate links

123

Cyber Week Sale

Tuesday, December 1, 2015

2016 Desk Calendars by Vitamini

Just popping in to let you know that my "cyber monday week" sale is still going strong! Use the code Merry15 to get 15% off your entire order through Friday, 12/4! Can't beat that! I have so many new products that have been a big hit on and offline - gift wrap, desk calendars (above), pillows, and holiday cards. Of course all the classics are there, too: fabrics, tote bags, coasters. I only have sales once or twice a year, so if there's something you've had your eye on, now's the time to pounce! :)

*I'm restocking a few items that sold out this past weekend. If you have any specific questions about lead times feel free to email me! casey(at)vitaminihandmade.com*

64

Thankful

Thursday, November 26, 2015

Crepe paper ombré

Happy Thanksgiving, everyone! I'm reflecting a little on all of the things I'm thankful for, and you, the readers of my blog came to mind immediately. 2015 has been quite a year for me, both professionally and personally. While the changes and adjustments haven't always been easy, I think they've prepared me for lots of awesome things to come! Thank you for stopping by to read a post, craft a new diy, or leave a comment, even when the posts have been few and far between. I'm looking forward to sharing lots of new content in the coming months.

Have a great day, eat lots of delicious food, and let your loved ones know how thankful you are to have them in your life.

*I'm also super-thankful for craft supplies. Photo above of some hand dyed crepe paper, via my Instagram

37

DIY Halloween Flower Vases

Wednesday, October 7, 2015

DIY Halloween Flower Vase | click through for the full tutorial!

Halloween season, how I love thee! I spotted these adorable little frosted vases at Michael's a few weeks ago, and as per my usual style, bought them with no idea what I'd do with them. I thought they'd be perfect for Halloween, though. They look like little apothecary bottles, don't you think? It wasn't until after I started playing around with paper flowers again that I realized they'd make perfect little flower vases, but they'd need a little bit of embellishing. You can use lots of different materials for this project - ribbons, foils, faux flowers, real, or paper ones like I did.

Here's what you'll need:
DIY Halloween Flower Vase | click through for the full tutorial!
  • Mini frosted vases. These came in packages of 2 at Michaels for something super cheap like $3
  • Double-sided scrapbooking tape. This stuff is super strong and comes in all sorts of widths. I used 1/8"
  • Transfer foil (This was the same brand I used but mine came in silver, gold, and copper colors)
  • Ribbon, baker's twine
  • Black paper
  • Silver or white pen
  • Hole punch
  • Flowers. Faux, real, paper, whatever you'd like. I made these black paper flowers myself. Craft stores carry Halloween themed silk flowers or you could use grocery store mums.

DIY Halloween Flower Vase | click through for the full tutorial! DIY Halloween Flower Vase | click through for the full tutorial!

Unroll a bit of the tape and stick it onto the bottom of the vase. Continue all the way around till the ends meet, and trim. Pull up the orange plastic to expose the other sticky side, and stick on the ribbon, match the ends and trim. So easy!
DIY Halloween Flower Vase | click through for the full tutorial! DIY Halloween Flower Vase | click through for the full tutorial! DIY Halloween Flower Vase | click through for the full tutorial! DIY Halloween Flower Vase | click through for the full tutorial!

You could easily just make a bunch of ribbon stripes, but I thought a metallic touch would be nice, so I repeated the steps with this foil transfer in silver. Once you expose the sticky tape again, just apply the silver strips with the shiny side up. Rub the strip down with your finger and then pull up. You're left with a super-crisp silver stripe!

DIY Halloween Flower Vase | click through for the full tutorial!

Cut a strip of black paper, notch one end and hole punch the other end. Write our your party guest's names and tie with ribbon or baker's twine. Add your Halloween flower and that's it!

DIY Halloween Flower Vase | click through for the full tutorial! DIY Halloween Flower Vase | click through for the full tutorial!

These would make adorable place cards at an October dinner or cute little party favors. They're so easy to make and customize. Plus the tape is fully removable so you can switch it up later if you decide. I like these so much I think I'll keep a few around all year. I hope you like them, too!

P.S. Check out my DIY Gallery page to see lots of diys from Halloween's past!

15

Martha Stewart American Made Awards Finalist!

Tuesday, September 29, 2015

Vitamini is a Martha Stewart American Made Awards Finalist! 
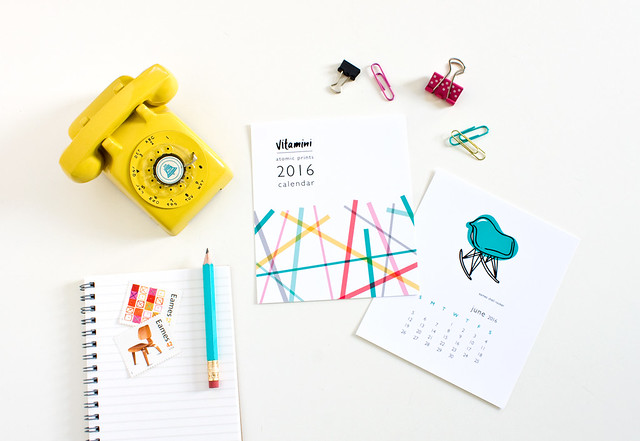
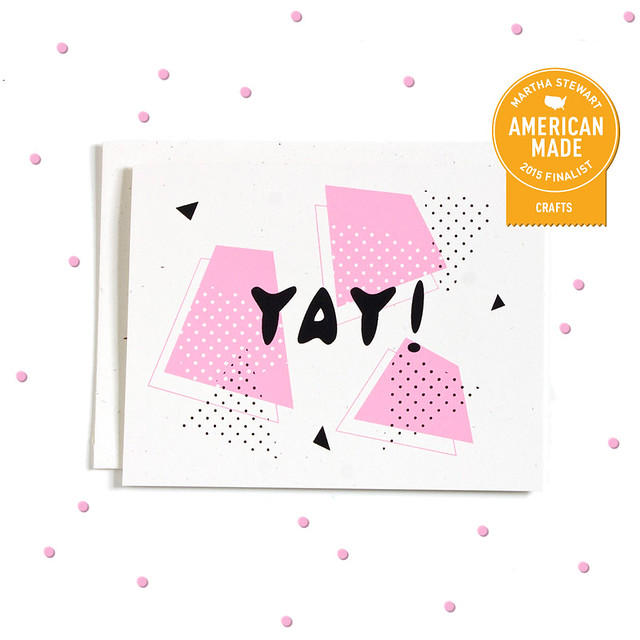
Just popping in to share some exciting news - Vitamini is a finalist in the Martha Stewart American Made Awards! Voting just opened up last week and it would mean the world to me if you'd click a vote or two (or 6!) my way. Click here to read a bit about my story and cast your votes!

*Yay! card from the shop.

43

DIY Stamped Gift Tags

Thursday, September 17, 2015

DIY Stamped Gift Tags | click through for the tutorial!
I'm excited to share this project for two reasons: first, it's really simple and the results are adorable! Second, I get to debut a few brand new products in the shop.

Retro Lawn Chair Rubber Stamps by Vitamini

New retro lawn chair rubber stamps from my Patio Party collection! I have three different designs available - they're the perfect way to jazz up greeting card envelopes, letters, and all sorts of other paper products, like handmade gift tags!

Here's what you'll need:
DIY Stamped Gift Tags | click through for the tutorial!
  • Rubber Stamps - you can find these three in my shop!
  • Pigment ink pad
  • Watercolor paper
  • Watercolors. I've had this Windsor Newton set since college and I love it
  • Paint brush
  • Tag punch
  • Hole punc
  • Baker's twine, embroidery thread, or yarn
DIY Stamped Gift Tags | click through for the tutorial!
Start with the watercolors. Dip the brush in water and pick up some paint. Dab it onto the paper and then try blending the edges with more water. Experiment mixing and blending colors together. Small areas of color are all you need, so have fun with it! Let dry.

DIY Stamped Gift Tags | click through for the tutorial!

Time for stamping! Place the stamp rubber side up on the table and tap the ink pad over it. When the design is saturated, stamp on the watercolor paper. Stamp up the whole sheet of paper - experiment with placement and see what you like best. My favorites had some white space underneath the image. Let dry. (If you'd like to try a more precise option, try stamping the designs first and then adding color to the open areas afterwards.)

Center the stamped design (save some space for the hole at the top) and punch! Punch 'em all out. Add the holes to the top, and tie up with twine.

DIY Stamped Gift Tags | click through for the tutorial!

How cute! I love the mix of colors. I used blues, greens, and yellows, but these could easily be customized in any color to match your favorite gift wrap. Make a bunch and give sets as gifts.
DIY Stamped Gift Tags | click through for the tutorial!

18

Hello, September!

Wednesday, September 9, 2015

Vintage Pink Swings Carnival Ride by Vitamini

Ok, seriously, how is it September already? The summer just flew by and I don't think I made nearly enough trips to the beach! I think it's ok, though - we're still rocking the triple digit temps so it'll probably feel like summer for a while longer. I just got home from a trip to Portland for a dear friend's wedding and had so much fun. It was the perfect time to take a little break, (mostly) unplug from the computer, and relax. I stayed in a cute little AirBnB studio in the Irvington neighborhood of Portland. Have you been? Talk about beautiful homes! I spent lots of time taking walks looking at the pretty houses, taking pictures, and drinking too much coffee (Saint Simon Coffee Co. on NE Broadway FTW). I'm back, feeling refreshed and ready to tackle all of the items on my to-do list! I'm also excited to get back into blogging after my little, unofficial summer break.

In other news, I got the best surprise while I was away - Vitamini has been chosen as a finalist for the 2015 Martha Stewart American Made Awards! Grinning face emoji times 100!! Check out my nomination page to read more about the story of my business. Voting opens up later this month.

Photo above from my Instagram of my favorite swing ride at the Monterey County Fair every year. Isn't it pretty? Love the pink. Have a great rest of the week!


16

New! Gift Wrap by Vitamini

Monday, August 31, 2015

New Retro Inspired Gift Wrap Patterns by Vitamini I'm so excited to share the newest product in the Vitamini lineup - gift wrap!

Retro Mid Century Chair and Jazzy Gift Wrap by Vitamini Dachshund Love Gift Wrap by Vitamini
Now available in 4 prints - Dachshund Love, Jazzy, Vintage Trailer Caravan, and Patio Party - the same prints from my fabric collection now on paper! I want to wrap everything with these! It would also be great for craft projects and scrapbooking; drawer liners, decoupage, art matting, etc.

Vintage Trailer Gift Wrap by Vitamini Vintage Trailer Gift Wrap by Vitamini

You can find all 4 different prints in the shop. More patterns coming soon!

16

Trailers in the Trees

Monday, August 17, 2015

Trailers In The Trees, Vintage Trailer Rally in Felton, CA. August 2015
As a vintage trailer enthusiast who doesn't actually have a trailer (yet) I jump at the chance to get close to them - you know, to help me figure out what kind I want. Ha! For reals though, if I can get an opportunity to admire even the exterior of a cool retro trailer my day is made. So, thanks times a million to Facebook for alerting me to this year's Trailers in the Trees rally, an annual vintage trailer show in the beautiful redwoods of the Santa Cruz Mountains. It was a couple Saturdays ago and was so much fun!

Trailers In The Trees, Vintage Trailer Rally in Felton, CA. August 2015 Trailers In The Trees, Vintage Trailer Rally in Felton, CA. August 2015 Trailers In The Trees, Vintage Trailer Rally in Felton, CA. August 2015 Trailers In The Trees, Vintage Trailer Rally in Felton, CA. August 2015
This was my first year attending and I wasn't quite sure what to expect, but hot damn, was it a great experience! The trailers, ranging in age from the 1930's to the 70's, were parked in rows and opened up and decked out in their Sunday best. Some of them were decorated with items from their exact time period while others worked with themes. Almost all of them had their door (some of the luxury models had two doors!) propped open with invitations to go inside and check 'em out. The owners were usually nearby to answer questions, share any interesting info about the trailer's history or unique features, and accept praise and general "oohs and ahhs."

Trailers In The Trees, Vintage Trailer Rally in Felton, CA. August 2015 Trailers In The Trees, Vintage Trailer Rally in Felton, CA. August 2015 Trailers In The Trees, Vintage Trailer Rally in Felton, CA. August 2015

Another great thing about this event - everyone was so genuinely nice. And seriously, how generous of them to open up their tiny little homes to strangers, even just for the afternoon? That's something I've discovered among clubs and groups of like-minded people. Similarly, I've never met anyone at a MINI club event that I didn't like and I imagine trailer clubs are the same. So many of them said "they're addicting" and I can imagine why. One lady told us how she and her husband attended the big rally in Pismo Beach one year, went home, found a classified ad for a trailer in the newspaper the next day and bought it!

Trailers In The Trees, Vintage Trailer Rally in Felton, CA. August 2015 Trailers In The Trees, Vintage Trailer Rally in Felton, CA. August 2015 Trailers In The Trees, Vintage Trailer Rally in Felton, CA. August 2015 Trailers In The Trees, Vintage Trailer Rally in Felton, CA. August 2015

If you're into trailers, too, check around for local clubs and events in your area. Also, follow the Vintage Camper Trailers page on Facebook for photos and news about up-coming rallies.

P.S. I've been having trouble loading comments here, but I'm working on a fix. Please standby! :)

29

DIY Easy Fabric Art

Wednesday, July 29, 2015

DIY Easy Fabric Art by Vitamini Handmade 
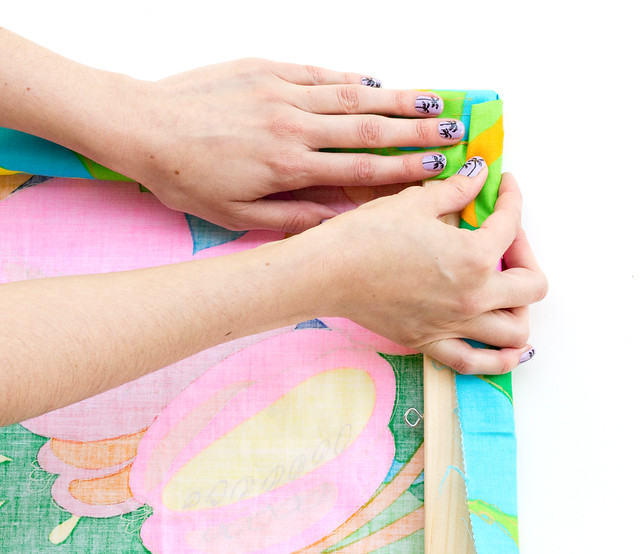
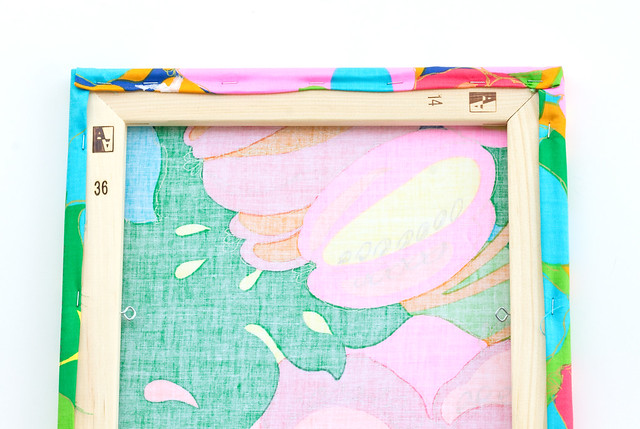
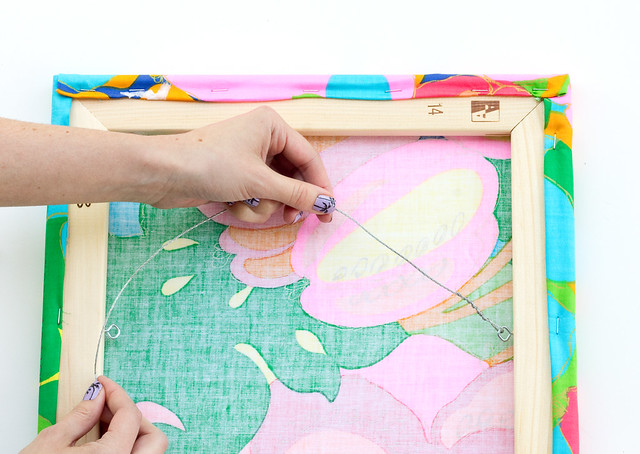
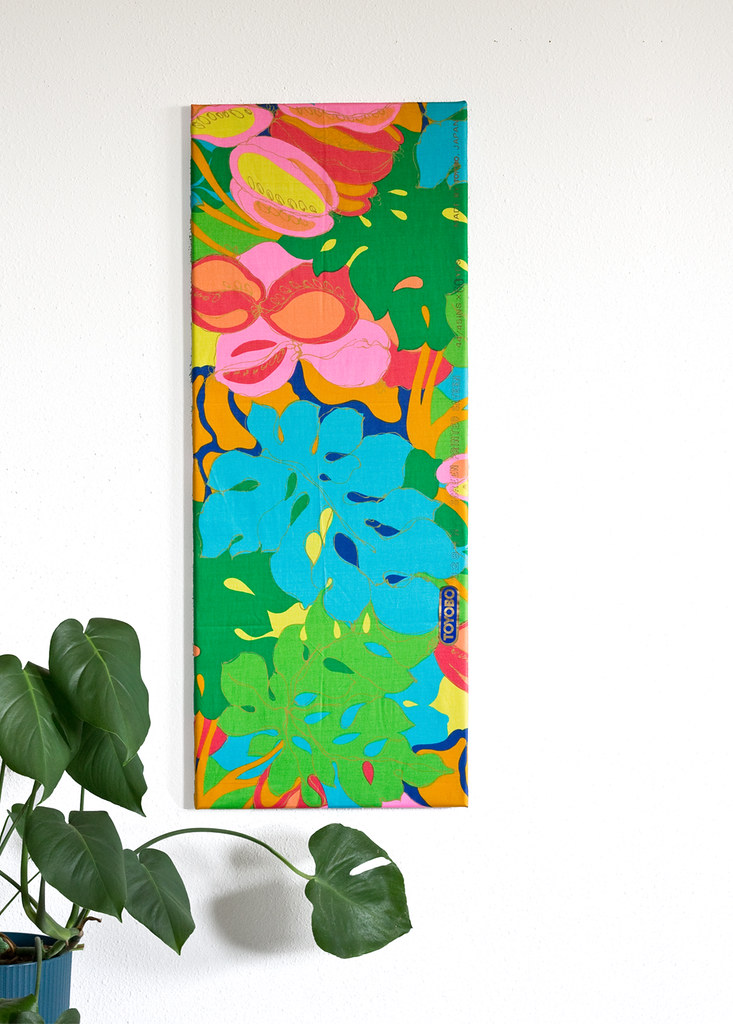
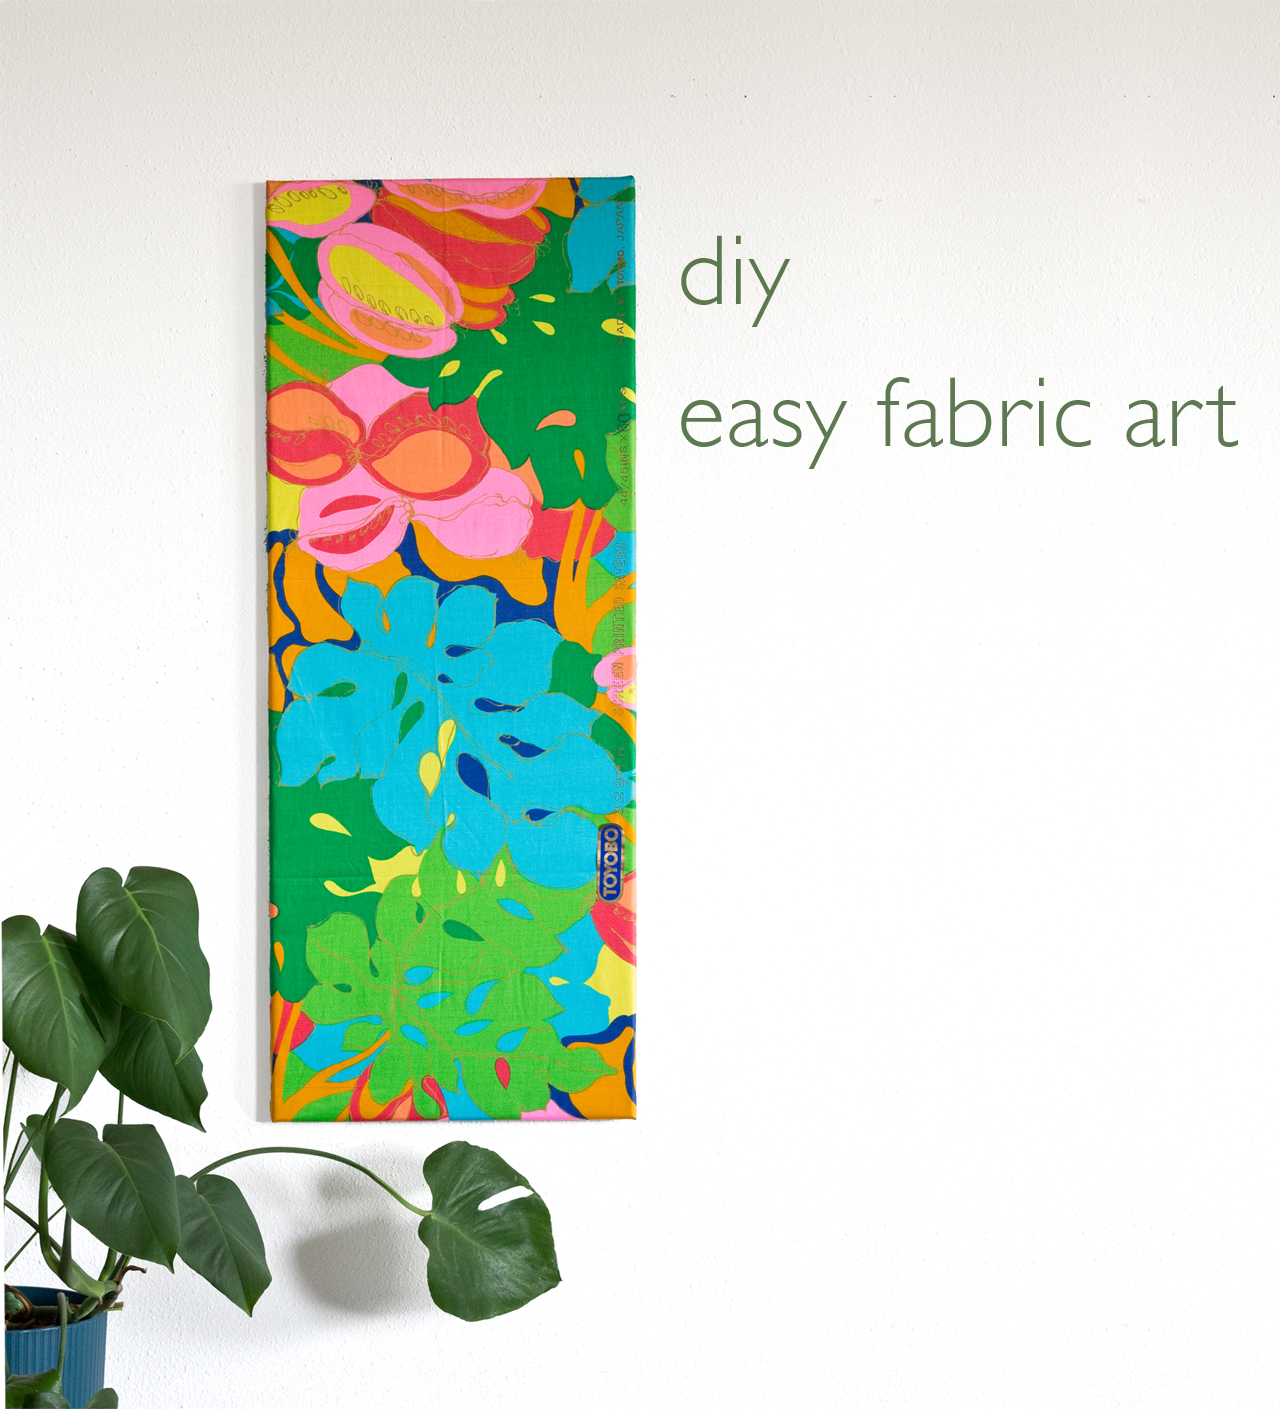
There's nothing better than a large piece of art in a room, but unfortunately, buying big framed art can get pretty expensive. I found a bunch of great vintage Japanese fabrics at a Buddhist Temple rummage sale last summer for a steal - something like $1 for the whole bundle. The prints were so great but the dimensions of the pieces were odd; long and skinny and not quite large enough to sew much with. I noticed this bright tropical print in my fabric stack the other day and realized it would look great on the wall! I have a trick for hanging up fabric panels on the wall that looks super professional but is actually so easy to DIY and inexpensive, too (the whole thing cost less than $10). I can't wait to share!
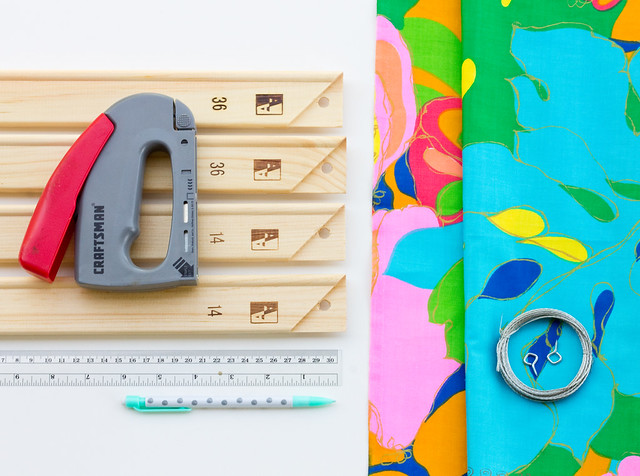
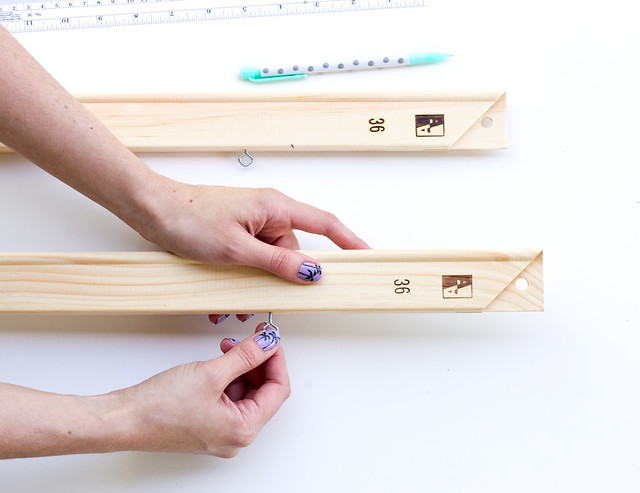
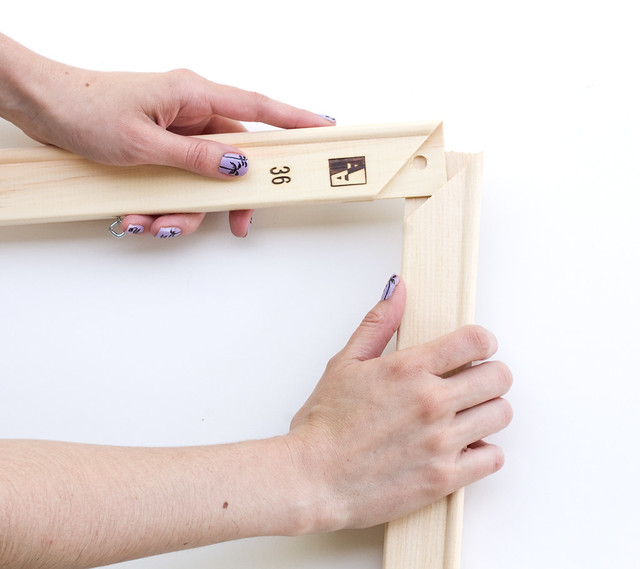
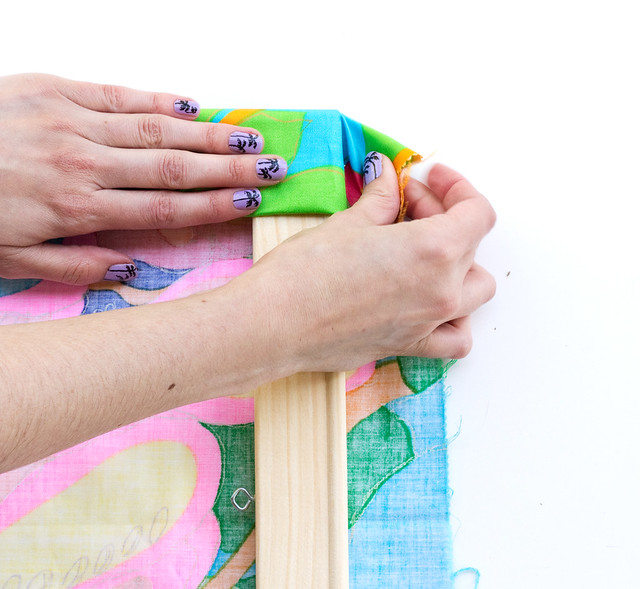
I love using wood canvas stretcher bars for this project because not only are they inexpensive but  you can also buy them in the exact dimensions that you are looking for. That said, this project could also be done with a picture frame.

Here's what you'll need:

DIY Easy Fabric Art by Vitamini Handmade
  • Fabric panel. Large scale prints work better than smaller ones
  • Canvas stretcher bars, 2 for the width and 2 for the height, both about 4" shorter in width and length than your fabric panel. These 4 stretcher bars cost me about $8 total (cool, right?!)
  • Staple gun with staples. I love this Craftsman staple gun. So easy to use.
  • Picture wire and "i" screws
  • Ruler and pencil

DIY Easy Fabric Art by Vitamini Handmade
Measure and mark the location for the "i" screws on the vertical pieces. Since mine was tall (14" x 36") I measured 7" down from the top of each side. Twist in the screws.
DIY Easy Fabric Art by Vitamini Handmade
Join the frame pieces. Mine made a pretty sturdy fit, but if yours are loose you can staple over the corners to secure.

Lay the fabric face down and center the frame over it. Make sure you've oriented the fabric so you know which way is up and the screws are near the top of the panel. Fold the edge of fabric down about half and inch, then fold it over the side of the frame. Staple in the center. Repeat on the opposite side of the frame, pulling the fabric taught before you staple once the center. Repeat on the other two sides. Continue folding over, pulling taut, and stapling on opposite sides, until the fabric is anchored all the way around the frame. DIY Easy Fabric Art by Vitamini Handmade DIY Easy Fabric Art by Vitamini Handmade DIY Easy Fabric Art by Vitamini Handmade
When you get the the corners, fold the fabric like wrapping a present to get a smooth corner and staple.

DIY Easy Fabric Art by Vitamini Handmade
Attach the picture wire to the "i" screws and twist the ends. Done! Hang from a picture hanging hook. Enjoy your big, custom artwork!

DIY Easy Fabric Art by Vitamini Handmade DIY Easy Fabric Art by Vitamini Handmade DIY Easy Fabric Art
This technique is a great way to make a big, high-impact piece of art for just a few bucks. Look for fabrics from your favorite designers to stretch and make art. I have a large scale Marimekko print that I've had hanging up for years. It still looks great and no one can tell it's not an expensive canvas print.

P.S. Like my palm tree nails? Learn how to do it yourself with my palm tree mani diy!
 

vitamini handmade © All rights reserved · Theme by Blog Milk · Blogger