


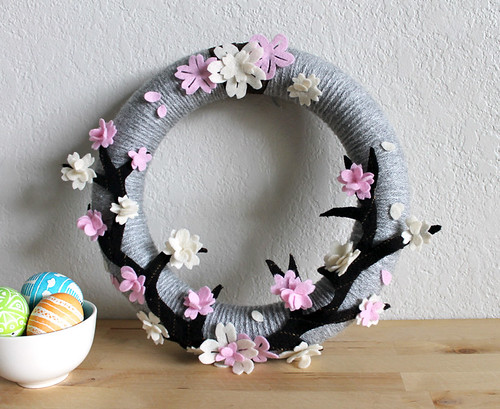
 I am totally addicted to making wrapped yarn wreaths! They are simple to make (depending on the level of detail) and can be customized for any season or holiday. The supplies are also inexpensive and easy to keep on hand. I started this one when I was in the middle of packing up my apartment for a move and was desperate to do something creative to maintain a little bit of my sanity. The first day of Spring was just last week, so I wanted to do something to mark the season: cherry blossoms!
Here's what you will need:
Wreath form, 12" diameter - I used a foam one
Skein of yarn - I used light gray
Felt - Cream, pink, and brown
Embroidery floss - any light color
Wire (optional)
Tacky glue
Hot glue
Ribbon for hanging

Wrap the wreath with the yarn, covering the entire form. I like to do this while I watch tv or a movie. Tie off the ends.

Cut flowers out of felt. I like to cut the felt into squares of varying sizes (about 1.5" to .5") before I cut the actual flowers. This helps to keep them somewhat uniform in size, even though they all come out a little different. Cut little v-shaped notches into the ends of the petals of some of the flowers. Cut little strips out of the center of the larger flower petals.

To make the ruffled centers of the blossoms, gather the petals of a single flower in your fingers and fold it, making the center of the flower a point. Using a needle and your embroidery floss, stitch through the center point a couple of times. Tie the floss in knot and trim.

I made about 36 flowers total. Once all of your flowers are cut and some are stitched, layer a few of the ruffled centers and the flat flowers, gluing them in the center with hot glue.

To make the branches, lay out your brown felt and cut two different branch shapes. You will be covering the branches with flowers, so keep the branch forms simple. Instead of regular felt, I used this felted, pinstripe wool that I had on hand from another project.

To add dimension to the branches, glue wire to the back of the main center branch and a few off-shoots. I couldn't find any regular wire in my craft supplies, so I used picture-hanging wire and it worked just fine! Tacky glue worked really well for attaching it to the felt. Once the glue is dry, bend your wire to give your branches shape.


Now all the components are ready to start laying everything out! Experiment with a few different layouts to find what you like the best. I used larger blossoms at the top of the wreath and at the bottom where the branches come together, to ground the design. I also added tiny felt "petals" and attached them in a random pattern to give the design movement. Wrap the top of the wreath with ribbon for hanging.


Here it is all finished! It was a fun little project and a nice distraction from all of the packing I've been doing lately. I can't wait to hang it on my new front door! Do you love felt and yarn wreaths as much as I do?
(Those Easter eggs in the picture were a project from last year. If you'd like to see how I made them, check out this post.)
So pretty! I love the way you gave dimension to the blossoms. An extra step, but so worth it!
ReplyDeleteThanks, Ann!
DeleteI love this! I am trying to recreate your felt flowers and I'm having trouble!! Is there any way you could post a little more direction on how you cut the flowers? Thank you!!
ReplyDeleteThanks for the comment and sorry for the delay in my response. I put together a post on how I made the flowers. You can find it here. I hope it helps!
DeleteThis is so cool! How long does this project take to make? Also, what type of felt did you use? Did you use the lightweight kind or the more stiff kind?
ReplyDeleteIs there any embroidery hoop used in it?
ReplyDeleteThe wreath is so cute. Can be converted into many different colors to create more diverse products Hexa sort
ReplyDeleteStickman Hook as technology advanced and internet connectivity became widespread, multiplayer gaming emerged as a dominant force in the industry.
ReplyDeleteWow, your cherry blossom yarn wreath sounds absolutely beautiful! I love how creative and Monkey Mart Game calming this project is—such a lovely way to welcome spring and de-stress during a move. Definitely inspired to try making one myself!
ReplyDeleteWhether you flip for fun or flip for glory, Wacky Flip gives you the tools to do both – with style, humor, and chaos.
ReplyDeleteI ran into a similar issue with materials. Instead of using standard supplies, I, too, had to improvise with what I had on hand, much like how the Slice Master found an alternative to regular wire. I was surprised at how well it all turned out, quite a creative adventure!
ReplyDeleteDid you know yarn's inherent flexibility is just brilliant for projects like these? Reminds me of the time I tried to arrange fairy lights around a doorway but the strand just kept tangling. Turns out, managing pliable things isn't always easy, a bit like navigating the chaos that is Slither io with 100 other players. I was ready to chuck the whole string of lights into the bin. Persistence paid off though, eventually it looked magical!
ReplyDeleteIn steal a brainrot, the thrill of the heist is complemented by the satisfaction of building your collection. Each Brainrot you acquire represents a small victory, contributing to your overall wealth. Celebrate your successes, but remain vigilant against the ever-present threat of theft from other players.
ReplyDeleteThis cherry blossom wreath is absolutely stunning - there's something so peaceful about creating these delicate felt flowers, perfect for marking special moments in your life countdown
ReplyDeleteI love how you used simple materials to create such a beautiful wreath - it's like solving a creative puzzle, similar to how I enjoy playing I'm Not a Robot Game where you figure out the right pieces to make everything work perfectly!
ReplyDeletebitlife captures the unpredictability and humor of real life through clever storytelling.
ReplyDeleteA Top Digital Marketing Service can truly transform business performance, and our experience confirms this. Their team developed comprehensive campaigns aligned with our objectives. They analyzed market trends and adjusted strategies proactively. As a result, we saw increased engagement and stronger brand awareness. Their commitment to excellence and transparent communication has made our collaboration both productive and rewarding.
ReplyDeleteI like that you can actually see the eyes clearly in most of these—so many event headshots end up with a weird glare or heavy shadows.
ReplyDeleteplay cartoon games online The technique of folding petals to create a ruffled center is clever and adds a nice texture to the wreath. It’s a simple yet effective way to bring life to the design The same idea of keeping things easy to follow is also why feels like a relevant fit here.
ReplyDeleteGame Is Hard I love how detailed the instructions are for making the ruffled centers of the blossoms. It's amazing how simple it is to create such a beautiful wreath with basic materials. The use of different felt colors adds a nice touch of realism. Definitely going to try this project this spring The same idea of keeping things easy to follow is also why feels like a relevant fit here.
ReplyDeleteEvery successful breathing problem solution starts with accurate diagnosis and professional guidance. Healthy habits, prescribed medications when required, and regular monitoring help individuals manage respiratory conditions more effectively and maintain better overall wellness.
ReplyDelete